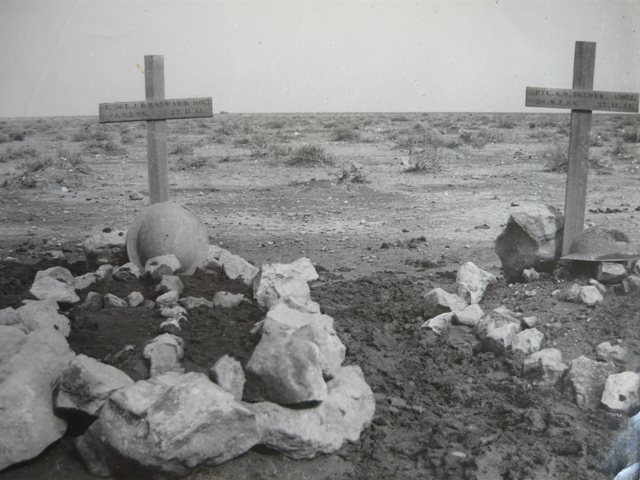
Lance Sergeant John Russell Hayward of the 20th NZ Battalion and Armoured Regiment was notable within the ranks of New Zealand's southern Canterbury's 20th Battalion as stated by his mate Pte. S.T. Stratton (Reg No 14724 later POW) as the "the Maori fella from Matata" Pte. S.T. Stratton was a friend and drinking mate of John's and was beside him in the slit trench when John as platoon commander ordered his boys to rise and advance..only seconds after that beside him again when L/Sgt John Hayward was killed in action instantly around mid day on the 27th November 1941 at the Belhamed feature near Sidi Rezegh in eastern Libya. His battle field grave above photographed by his 28th (Maori) Battalion brother Edward, is along side 35 other comrades who also fell that day, 62 were also badly wounded. L/Sgt. John Hayward's friend and comrade Pte. S.T.Stratton later that same day was wounded in the upper leg by a piece of mortar bomb shrapnel and captured soon after, he was posted missing on December the 13, 1941.
John was a Sgt. platoon leader of A company and part of a 20 Battalion assault using A and B companies onto a well dug in an perfectly camouflaged heavily armed and highly under estimated, 600 strong German defensive position at the base of the Belhamed escarpment rise which contained well dug in 50mm anti-tank, mortar, MG, anti air and light artillery guns within. His 20 Battalion C.O. in Captain Agar complained to his superior (Colonel Peart) of the seemingly futile attempt without timed artillery or tank support. He also stated rightly that we have very little actual knowledge of this particular Tobruk German defensive position, all to no avail. He was firmly told we must open the corridor to relieve Tobruk and as well we believe they are on the brink of surrender, with that Capt. Agar returned to the two forward 20 Battalion companies. Bayonets were fixed the assault orders given which was timed to start at 11.00am with no less than 2000 yards of naturally unprotective flat ground to cover. L/Srgt. Russell Hayward under concise orders rose from his shallow stoney sangar trench (after spending a freezing night in) to wave his platoon forward. 200 or 300 yards in the German Maschinengewehr MG34 7.92mm machine guns cracked open.. killing him and other A and B coy boys instantly. The casualty rate was as high as 80% within these courageous Kiwi battle companies..
This same day the NZ 4th Brigade C.O. Brigadier H. Kippenberger was also wounded, nearly taken prisoner and within the space of the next 48 hours the Battalion was virtually wiped out, with huge casualties taken and its head quarters severely mauled by the 15th Panzer Division. Something and someone had certainly made some errors in judgement, once again grossly under estimating the enemy and seemingly showing little reconniscance abilty. The one mitigating factor in my opinion was the severe lack of supplies and ammunition stores we had at that point because of great difficulties our NZ supply columns had getting to the confused and changing areas of battle.
After the long running battles (in response to Auckinlech's Operation Crusader) on and around the 27th of November 1941 in which Rommel and fellow Kommanders Cruwell and particularly Neumann-Silkow had been long demonstrating superior strategy and tactics,it took the NZ Divisions lonely tenacity to slow them,but the price was high. Being very active days for both sides with wide areas around Sidi Rezegh, Belhamed, Trigh Capuzzo and El Duda encompassing most of the Divisions and Battalions on both sides. The Allies in the 8th Army, 30 Corps led by Lt Gen Ritchie with Gott, Freyberg, Norrie, Godwin-Austin, Cunninham, Scobie and the DAK forces led by Field Marshall Kesselring with General Rommell and Major Generals in Neumann-Silkow GOC 15 Panzer Division, Suemmermann GOC 90 Light Divivison, Cruwell, Von Ravenstien GOC 21 Panzer Division and Westphal leading the Panzerarmee better known as the Afika Korps.It proved a tough day also for our main NZ Field Hospital and dressing station in a hollow set up near Wadi-esc-Sciomar ( Rommell showing chivalry never bothering anyone simply asking questions and looking around) which was completely over run with 900 Allied wounded and sick including 100 ememy, by Neumann-Silkow's troops and very nearly taking out the Head Quarters of 13 Corps and NZ Division with General Freybreg there, being just a few miles away,such a close call.But hours later on the 29th. a stroke of luck whereby Kiwis of the 21st Battalion C Coy.14 platoon's few battle worn survivors spotted a German staff car which had stopped and were looking through field glasses directly down at them.Captain Harold Smith and 3 other platoon members Lt. Jack Money and Pvts.Bob Nicol and Cliff Vause fired a few rounds with the Germans dropping to the sand and without a return shot fired they bagged 3 surprised Germans, one being General Von Ravenstien second in command of the Afrika Korps under Rommel and Commander of the 21st Panzer Division along with his driver, guard and a car load of nice top shelf goodies including vital maps and notes.
With complex and contradictory orders coming from the 8th Army HQ. culmimating in the standing down of its field chief at this point, Lieutenant General Sir Alan Cunningham and further problems and indecision arising with the replacement, the Allied Army in the main was leaderless in the field for a short while.The replacement Lt. General Neil M Ritchie (later to also be stood down) reluctantly was selected (although he had to come from the UK) and time was needed to stabilise the situation,"Operation Crusader" saved Tobruk but the cost was huge, with two thirds of the NZ Division taking casualties of 4800 killed,wounded or POW between Nov.41 and Feb.42. We had certainly shown our Kiwi tenacity almost single handedly opening the Tobruk corridor, but it was now time to withdraw and refit.
English Brigadier A.H. Gatehouse and his 4th Armoured Brigade with his 115 tanks against orders to support us and pleas from our Brigadiers Barrowclough and Inglis failed us at a critial time, finding beniegn excuses for his crucially timed withdrawal to rest and lager for the night,little help to the 2NZEF and our struggling 4th Brigade prisoners taken during the night..history may well have changed course and saved tens of thousands of lives if the English 4th Armoured Brigade had taken out the 40 odd MKIV panzers that wasted us.
Confidence had slipped somewhat in the Commander in Chief of the Middle Eastern and Mediterranen zone,Field Marshall Claude Auckinlech,although he was not entirely to blame either,having to learn desert warfare strategies and tactics and with a demanding and at times unrealistic English Prime Minister not helping. I wonder at that point if his successor General Montgomery could have done any better,although Montgomery was more rapidly conclusive than Auckinlech proved to be, he still made errors in being too cautious ie.requiring 2:1/3:1 ratios before entering battle and he could be slow ( later, the disastrous Holland/Germany airborne Arnem landings) to heed good advice,but certainly gained greater trust from a more transparent approach.For me the jury will always be out between Auckinleck and Montgomery,great gratitude and respect was shown to Freyberg's NZ Division by both these Field Marshalls by campaigns end.
Much ado is and was made over the Germans having vastly superior tanks and heavy weapons than the Allies. It is my belief that this was not entirely the case, our wider combination of tank types in the main carried no major inferiority (generally having thicker armour protection) other than lack of speed for some and the Valentine tanks two pounder gun certainly was a laughing matter against an "88" It was our tactical strategies and use thereof which were certainly inferior leading to blame the tanks, Rommel, Neumann-Cruwell and Von Ravenstien were masters of concentrated, combined and collective assault with his Panzer Divisions and associated regiments which includes artillery, anti tank guns and mobile infantry. Where as strangely the English constantly seemed to want to fight at the smaller brigade level unable (seemingly fearfull of attack from all quarters) to concentrate and combine infantry with tank forces. This dispersment and spreading of its energies into many areas with often limited communications was constantly disastrous.
General Freyberg was notoriously and continually critical from the onset of our constant defensive rather than offensive strategy, which created frustration for our Kiwi boys to needlessly endure,certainly after Greece and Crete fiascos. Combined with the inability to trust the English Armoured Divisions to support our battle fit,inteligent, calm under fire and solid in attack NZ Division, General Freyberg as usual was definetly on the money.
Where the Germans were clearly superior initially as in most theatres of technology was: Anti-tankguns,Artillery and Armoured Personnel Carriers. With their amazingly versitile and high velocity 88mm anti-everything mobile gun, and the reliable general purpose 105mm and larger 210mm howitzers.Couple those with the fantastic low profile (easily camouflaged) 50mm Pak38 anti-tank gun, which had a significantly greater penetrative power than the 50mm Panzer MKIII tank gun,with the proportion of these anti tank guns to infantry being far higher than the Allies considered.The brilliant German tactics of keeping these 50mm anti-tank guns close to the Panzers in battle often leading the Allies to think it was the tanks doing the damage when in fact it was the highly mobile and easily hidden anti-tank gun.
The German half track all purpose/personnel carrier was also not initially counted by the Allied Command (until the smaller American M30/40 half tracks arrived) with its ability to move infantry quickly and in good numbers over most terrain remained a vital part of what was eventually the much numerically inferior German and Italian Armies. These large and reasonably powerfull half trackers were many times seen towing an 88mm gun with crew and additional infantry on board, a mortal long range combination indeed.
As mentioned, photograph above of Lance Sergeant John Hayward's battlefield grave at Belhamed was sadly taken when brother Edward arrived only days before Christmas 1941.
Interesting to note that with choice like brother Edward, John, who also and obviously had Te Arawa Maori ancestry prefered (as his other 2 brothers did in the RNZAF) to represent his European heritage when signing to fight the great threat to civilisation and freedom as they knew it.
Hayward family Rotorua.Denis Clough archive
Comments (0)